Post Quantum Secure Strongswan with Liboqs

Background
As we all know that the advent of sufficiently powerful quantum computers poses a significant threat to our exisiting Public Key cryptosystems. This is due to the ability of quantum computers to be able to break the underlying mathematical problems of integer factorization & discrete logarithm.
In this regard, there is an ongoing effort to standardize Post Quantum secure Key Encapsulation Mechanism (KEM) & Digital Signature Algorithms by NIST. As of September 2023, NIST has already approved one key exchange method (Kyber) and three Digital Signature algorithms (Falcon, Dilithium & SPNHINCS+). In this blog, we’ll take a look at how we can we can use these algorithms inside Strongswan to establish VPN tunnels that are Post Quantum secure.
LibOQS
LibOQS is the open source C library that provides a collection of implementation of Post Quantum Safe KEM and Digital Signature algorithms. It is released under the MIT Licence and supports builds that are both multi-platform(Linux, macOS, Windows) and multi-architecture(x86_64 & ARM) compliant. The purpose of this library is prototyping & evaluation of quantum resistant cryptography.
PQ Secure Strongswan Beta Release
Strongswan is the complete IPSec solution providing encryption & authentication to client and a server for secure communication. Details of how to setup simple strongswan between two endpoints are covered in my previous blog. Here we will focus on the Post Quantum secure implementation of Strongswan that utilizes the above mentioned LibOQS library.
At the time of this writing, strongswan-6.0.0beta4 is the latest release of PQ secure Strongswan that uses the codebase of strongswan-5.9.11 as well as liboqs-0.8.0 version
LibOQS source compilation
We start by installing the dependencies for LibOQS using
1
sudo apt install astyle cmake gcc ninja-build libssl-dev python3-pytest python3-pytest-xdist unzip xsltproc doxygen graphviz python3-yaml valgrind
Then we go towards compiling libOQS from source as a shared library. This shared library will later be used during strongswan compilation for building the “oqs” plugin that enables PQ crypto algorithms.
Go to your home directory, and create a directory for LibOQS source. Then we clone the LibOQS github repository into this directory. As a normal user we proceed as follows
1
2
3
cd ~
mkdir liboqs-src && cd liboqs-src
git clone https://github.com/open-quantum-safe/liboqs.git
Once completed, we need to checkout the correct version of LibOQS to use. In this case, we are going with version 0.8.0, so we proceed as follows
1
2
3
4
5
cd liboqs
git branch -a
git tag
git checkout 0.8.0
mkdir build && cd build
CMake Compilation
LibOQS uses the CMake tool for its build process. There are many different build options that we can use to customize the build according to our requirements, and they are detailed on the official LibOQS wesbite here. As for our use case, we can use the following options with cmake
1
cmake -GNinja .. -DCMAKE_INSTALL_PREFIX=/home/umair/liboqs-src/liboqs/build/ -DBUILD_SHARED_LIBS=ON
Use the DCMAKE_INSTALL_PREFIX option according to the path of liboqs build directory of your specific machine. Upon successful completion of the above commands, we use
1
2
3
ninja
ninja run_tests
ninja install
for the actual compilation, testing and installation tasks.
At this point, we should have all the required files properly installed inside the build directory we created earlier. Below are the contents of the build directory after successful build of LibOQS. 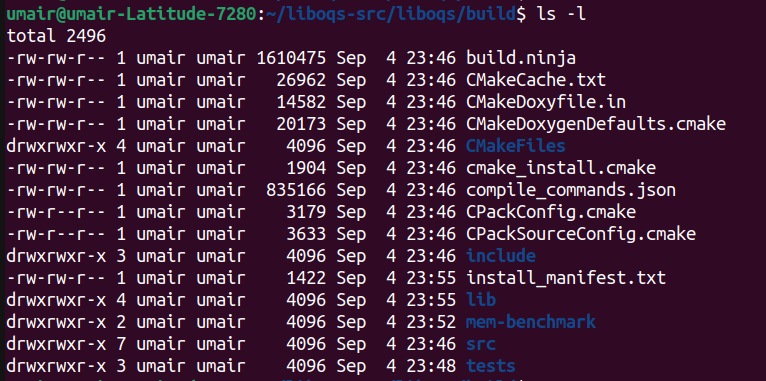
Take a note of the ‘lib’ and ‘include’ directories as they will be used later during PQ Strongswan compilation. This is all thats needed of LibOQS at this time. Now we move towards PQ Strongswan compilation.
Testing The Compiled Library
Before moving towards strongswan compilation, we need to test whether the LibOQS shared library has been compiled successfully and that we can use it in a C program file. For this purpose, there are various example C files given in ‘tests’ directory of LibOQS using which we can test the library.
We go to the main LibOQS directory, and then run a customized ‘gcc’ command to compile the ‘example_kem.c’ file in ‘tests’ directory.
1
2
cd /home/umair/liboqs-src/liboqs
gcc -Ibuild/include/ -Lbuild/lib/ -Wl,-rpath=build/lib tests/example_kem.c -o example_kem -loqs -lcrypto
After running the compiled binary,
1
./example_kem
we should get an output like below, which means that the compiler has successfully found the shared library as well as the header files located in ‘build’ directory of LibOQS to compile the C file.

Below is a brief explanation of the above ‘gcc’ command used for compilation
- -Ibuild/include: The -I option specifies the directory/s to be searched for header files being included
- -Lbuild/lib/: The -L option specifies the directory/s to be searched for libraires specified in the -l option. In this case, the shared library of LibOQS will be found in build/lib directory
- -Wl,-rpath=build/lib: The -Wl is used to pass options to the linker, in this case -rpath is being passed as option to the linker. The -rpath option specifies the directory to be searched for shared library (oqs in this case) for the ‘ld’ linker
- tests/example_kem.c -o example_kem: The C file as input and compiled binary as output is being specified here
- -loqs -lcrypto: The -l option specifies the name of shared libraries being used by the program.
strongswan-6.0.0beta4 compilation
We have done a detailed source compilation of strongswan in our previous blog. Here the steps are largely the same, except for the inclusion of libOQS shared library in the build process for OQS plugin.
Start by creating a directory for Strongswan source in your home directory. Then use ‘wget’ to download the tar source of 6.0.0beta4 release of strongswan as a normal user.
1
2
3
cd ~
mkdir strongswan-src && cd strongswan-src
wget https://download.strongswan.org/strongswan-6.0.0beta4.tar.bz2
Next, we use ‘tar’ command to extract strongswan source from the downloaded tar file
1
tar xf strongswan-6.0.0beta4.tar.bz2 && cd strongswan-6.0.0beta4/
To keep this installation of strongswan isolated from global configurations in our machine, we create a ‘build’ directroy inside the extracted strongswan source files. This is where all executables and library files of strongswan will be found after successful compilation.
1
mkdir build
Next, we run the configure script as follows.
1
LIBS=-loqs CFLAGS=-I/home/umair/liboqs-src/liboqs/build/include/ LDFLAGS=-L/home/umair/liboqs-src/liboqs/build/lib/ ./configure --prefix=/home/umair/strongswan-src/strongswan-6.0.0beta4/build/ --enable-oqs
These options will make sure to include the proper header files and shared LibOQS library during strongswan configuration. More detail about different options for the configure script are available by running it with ‘–help’ option.
The output of a successful run of the configure script will be

Next, we use the ‘make’ commands for actual compilation and installation
1
2
make -j5
sudo make install
Following will be the content of ‘build’ directory that we created above inside the strongswan source folder. 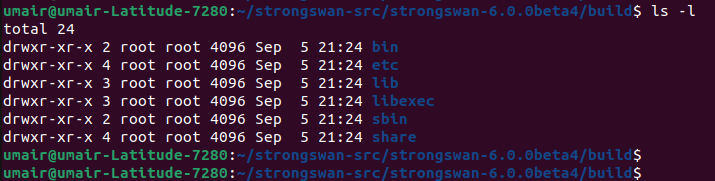
Further Configurations & Verification
At this point, we have successfully compiled both LibOQS & PQ-Strongswan. Now we need to correctly use the charon dameon by setting appropriate environment variables. Run the following command to see existing configuration of dynamic link loader search paths.
1
echo $LD_LIBRARY_PATH
We will now add the custom path to our compiled LibOQS shared library to this environment variable as follows
1
2
3
sudo su
export LD_LIBRARY_PATH=$LD_LIBRARY_PATH:/home/umair/liboqs-src/liboqs/build/lib/
ldconfig
Now if we again run the above ‘echo’ command, we shall see our custom path. Run the charon daemon using
1
./charon
We should see the following output

Notice ‘oqs’ in the list of loaded plugins. This means that everything uptil this point was configured correctly and the oqs plugin has been successfully loaded.
Open another terminal window, convert to super user, and repeat the previous process of setting the environment variable correctly.
1
2
3
4
sudo su
export LD_LIBRARY_PATH=$LD_LIBRARY_PATH:/home/umair/liboqs-src/liboqs/build/lib/
ldconfig
cd /home/umair/strongswan-src/strongswan-6.0.0beta4/build/sbin
We changed into the ‘sbin’ directory. It contains the ‘swanctl’ executable which we will use to see the list of available Post Quantum algorithms as shown below
1
./swanctl --list-algs
The output contains

At this point, we are now ready to start configuring swanctl config files to for the ikev2 tunnel between two end-points and use Post Quantum secure algorithms between them.
Testing
Our test scenario includes establishing an IPSec tunnel using one of the available PQ crypto algorithms between two end-points. One of the end-points will be my local machine connected to a home network with a router that performs NATting using a Public IP on the WAN side and local private subnet on the LAN side. The other end point will be an AWS EC2 instance of Ubuntu running PQ Secure strongswan which has been compiled using the above descibed method.
Once we have PQ strongswan successfully running on both end points, we proceed towards swanctl and other configuration files on both local machine and the AWS instance.
AWS EC2 Instance Configurations
To keep things simple, we will try to use as much of the default settings in AWS as possible. These include staying as close to default Routes, Subnets, Public IP, and Security Groups as possible. We will only modify the Security Groups to allow ICMP, SSH and UDP traffic at port 500 (and 4500) for Ping, Remote Access and ISAKMP packets respectively. Following are the inbound rules for this security group
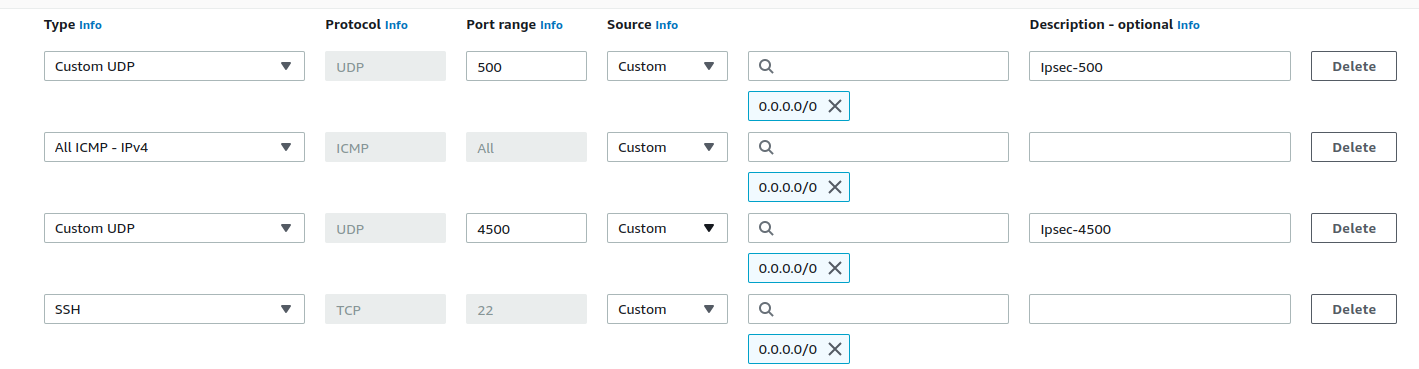
Note: These rules are being used only for testing purposes. In a real production environment, you wouldn’t be specifying wildcard addresses like 0.0.0.0/0 that allow inbound traffic from anywhere
Next, we configure the swanctl.conf file at ‘/home/ubuntu/sswan-src/strongswan-6.0.0beta4/build/etc/swanctl’ as follows
1
2
3
4
5
6
7
8
9
10
11
12
13
14
15
16
17
18
19
20
21
22
23
24
25
26
27
28
29
30
31
32
33
34
35
36
37
38
39
connections {

   gw-gw {
      local_addrs  = <private IP of EC2 instance connected to Internet gateway>
      remote_addrs = <Public IP of Home Router>

      local {
         auth = psk
         #id = moon.strongswan.org
      }
      remote {
         auth = psk
         #id = sun.strongswan.org
      }
      children {
         net-net {
            local_ts  = 10.10.10.0/24
            remote_ts = 10.10.10.0/24

            #updown = /usr/local/libexec/ipsec/_updown iptables
            rekey_time = 5400
            rekey_bytes = 500000000
            rekey_packets = 1000000
            esp_proposals = aes256-sha256-x25519-ke1_kyber3
         }
      }
      version = 2
      mobike = no
      reauth_time = 10800
      proposals = aes256-sha256-x25519-ke1_kyber3
   }
}

secrets {
   ike-1 {
      id = 0.0.0.0/0
      secret=<pre-shared key>
}}
Local Machine Configurations
Keeping everything close to defaults, we dont need to change any Firewall rules to allow ports or anything. As this is a simple testing scenario, we will initiate tunnel connections from the local end-point. This will ensure that IPSec connections are seen by the router as outbound connections and hence they won’t be blocked by the router.
We now configure the swanctl file of our local machine placed at ‘/home/umair/strongswan-src/strongswan-6.0.0beta4/build/etc/swanctl’ as follows
1
2
3
4
5
6
7
8
9
10
11
12
13
14
15
16
17
18
19
20
21
22
23
24
25
26
27
28
29
30
31
32
33
34
35
36
37
38
connections {

   gw-gw {
      local_addrs  = <Private IP of local machine obtained by router's DHCP>
      remote_addrs = <Public IP of EC2 instance>

      local {
         auth = psk
         #id = moon.strongswan.org
      }
      remote {
         auth = psk
         #id = sun.strongswan.org
      }
      children {
         net-net {
            local_ts  = 10.10.10.0/24
            remote_ts = 10.10.10.0/24

            #updown = /usr/local/libexec/ipsec/_updown iptables
            rekey_time = 5400
            rekey_bytes = 500000000
            rekey_packets = 1000000
            esp_proposals = aes256-sha256-x25519-ke1_kyber3
         }
      }
      version = 2
      mobike = no
      reauth_time = 10800
      proposals = aes256-sha256-x25519-ke1_kyber3
   }
}

secrets {
   ike-1 {
      id = 0.0.0.0/0
      secret=<pre-shared key>
}}
After the swanctl.conf files have been properly configured on both endpoints, we will start the charon daemon. It is found in the ‘strongswan-build-directory’/libexec/ipsec on both endpoints. Next, in another terminal window, we move into ‘strongswan-build-directory’/sbin and use
1
./swanctl --load-all
command to load the configurations that were written into the swanctl.conf file. Following is the output of this command

After loading the swanctl configuration on both endpoints, we move towards initiating the IPSec tunnel from the local machine and monitoring IPSec packets on the EC2 instance.
First we run the logs monitoring command on the EC2 instance as
1
tail -F /var/log/syslog
Now run the swanctl initiation for child_sa from local machine as below
1
./swanctl --initiate --child net-net
A PQ secure tunnel using PQ Kyber KEM algorithm has been successfully established between the two endpoints. Now any communication from the specified traffic selectors will go through the internal encrypted/authenticated ESP tunnel.