Cross-compiling Post Quantum Secure Strongswan for Windows

Background
Building upon the previous post, the focus of this blog post is the cross-compilation of Post Quantum secure version of Strongswan for the Windows platform.
Cross Compilation
Before diving into the world of cross-compilation, we first try to develop an understanding of what ‘Native compilers’ are. Native compilers convert high level languages into low-level binaries for the same machine that they are running on. Native compilers can generate highly optimized, efficient and faster running code for the same machine that they are running on.
Moving towards cross-compilation, these compilers are capable of generating binary files for source code written on one machines but that is intended to be executed on a different machine. As opposed to native compilers, a cross-compiler is not limited to hardware or operating system that it is running on. For example, we can write code in C language on Ubuntu Linux and then using a cross-compiler for Windows-10 (mingw-w64) we can cross-compile an executable of this code. This can then be transferred to a windows-10 machine, and it can easily be executed there.
Typical use-cases for cross-compilation include devices where it is infeasible to setup a development environment for example embedded devices. In this case, although we do have the means to compile strongswan, libOQS & openssl natively on the Windows machine, but to demonstrate the working of a windows cross-compiler on Ubuntu, we will be doing it with the cross-compilation method.
Mingw-w64: The Cross-compiler for Windows
Mingw-w64 is the open-source development environment for cross-compiling MS Windows applications. It includes a port of GCC, GNU Binutils for Windows, a set of Windows specific header files and static import libraries, enabling use of the Windows API. It also includes a Windows native build of the GNU Debugger and other miscellaneous utilities. Wikipedia
It can be hosted natively on Windows or cross-hosted on Linux, which is what we’ll be doing for this tutorial.
Steps Overview
We proceed as follow;
- We start by the installation of mingw-w64 cross-compiler for Windows on our ubuntu machine
- Since we are want our cross-compiled application (PQ Secure Strongswan) to run on Windows, we will also have to cross-compile the two important libraries that it depends on i.e. OpenSSL and LibOQS. Since OpenSSL is required for LibOQS as well as for Strongswan, it will be cross-compiled first.
- The result of cross-compilation of LibOQS and OpenSSL libraries will be ‘.dll’ files. These shared libraries can be transferred over to the Windows machine, and placed in standard locations.
- Then we will cross-compile an example file from the ‘tests’ directory of LibOQS. Successful execution of this cross-compiled example file shows that LibOQS and OpenSSL have been cross-compiled successfully.
- Finally we move towards the cross-compilation of PQ-Secure Strongswan. This will use the two previous cross-compiled libraires as well.
- Transfer all necesaary binaries and configuration files to the Windows machines and test successful working of strongswan by establishing PQ Secure site-to-site tunnel with an ec2 isntance in AWS.
OpenSSL Library Cross-compilation
We start by first updating our package manager’s repositories and upgrading any previous packages. Then install the mingw-w64 cross-compiler as follows.
1
2
3
sudo apt update
sudo apt upgrade -y
sudo apt install mingw-w64 -y
Next, we will create three directories in the ‘home’ directory of normal user. These will be used for the two libraries and strongswan compilation purposes.
1
2
3
4
cd ~
mkdir windows-openssl-src
mkdir windows-liboqs-src
mkdir windows-sswan-src
Moving into the openssl directory, we shall clone the openssl git repository and create a build directory to hold our corss-compiled OpenSSL library.
1
2
3
4
5
cd windows-openssl-src
git clone https://github.com/openssl/openssl.git
cd openssl/
git checkout openssl-3.0.1
mkdir build
Then we’ll use appropriate options for the ‘configure’ script of OpenSSL to specify the cross-compiler and build directory.
1
2
3
./Configure --prefix=$PWD/build --cross-compile-prefix=x86_64-w64-mingw32- no-asm no-deprecated mingw64
make -j7
make install
Explanation of some of the configure script options is as below
- –prefix: It specifies the top of directory where the Library will be installed. In this case, it specifies the ‘build’ directory that is located inside the current working directory.
- –cross-compile-prefix: It specifies the PREFIX to include infront of toolchain commands. It mostly ends with a dash (-). In this case, specifying the cross-compiler-prefix as x86_64-w64-mingw32- will invoke gcc as ‘x86_64-w64-mingw32-gcc’
- mingw-w64: Specifies the target platform to use when building OpenSSL.
These options are detailed in the INSTALL file inside root directory of OpenSSL. The ‘make’ commands in the end will start the compilation process, and once completed, install the cross-compiled OpenSSL files into the build directory.
The dll file that will be trasnferred to our Windows is ‘‘libcrypto-3-x64.dll’ found in build/bin directory of OpenSSL.
LibOQS Library Cross-compilation
Now we move towards the cross-compilation of LibOQS library. Here again, we will be using some custom options for the CMake build. Move over to the directory ‘windows-liboqs-src’ in the home directory, and get source for the 0.8.0 version. Also we create a ‘build’ directory to hold the cross-compiled liboqs library.
1
2
3
4
5
cd /home/umair/windows-liboqs-src
git clone --depth=1 --branch=0.8.0 https://github.com/open-quantum-safe/liboqs.git
cd liboqs
mkdir build
cd build
Next, we run the following command to configure LibOQS build system using CMake.
1
cmake -GNinja .. -DCMAKE_INSTALL_PREFIX=/home/umair/windows-liboqs-src/liboqs/build/ -DCMAKE_TOOLCHAIN_FILE=../.CMake/toolchain_windows-amd64.cmake -DOQS_DIST_BUILD=ON -DBUILD_SHARED_LIBS=ON
Explanation of these options is as below
- -GNinja: It specifies the build system generator when configuring a CMake project, in this case ‘Ninja’
- -DCMAKE_INSTALL_PREFIX= This option specifies the custom directory where ‘ninja install’ command will place the cross-compiled library
- -DCMAKE_TOOLCHAIN_FILE= This option specifies the path to the toolchain file defining various options related to cross-compilation. These include cross-compiler, toolchain utilities, target platform and other compiler related options. In this case, the ‘toolchain_windows-amd64.cmake’ file is provided within the LibOQS library and can be directly used for our use case.
- -DOQS_DIST_BUILD= This option builds the Distributable library with optimized code for several CPU architectures.
- -DBUILD_SHARED_LIBS= This option will build LibOQS library as a shared library instead of a static one.
Next we use ‘ninja’ for actual compilation and installation as
1
2
ninja
ninja install
The end result that we are interested in, is the dll file of LibOQS placed in build/bin directory named ‘liboqs.dll’.
Testing LibOQS and OpenSSL
Now that we have built the dll files of both LibOQS and OpenSSL, we need to test whether they were cross-compiled successfully or not. To do this, we cross-compile a simple C program given in the ‘tests’ directory of LibOQS, while leveraging the two cross-compiled libraries. Then we will transfer this cross-compiled executable alongwith the two dll files to the windows machine. Move to the main directory of LibOQS and cross-compile the ‘example_kem.c’ file as follows
1
2
cd /home/umair/windows-liboqs-src/liboqs
x86_64-w64-mingw32-gcc -Ibuild/include/ -I/home/umair/windows-openssl-src/openssl/build/include/ -Lbuild/lib/ -L/home/umair/windows-openssl-src/openssl/build/lib64/ -Wl,-rpath=.:build/lib/:/home/umair/windows-openssl-src/openssl/build/lib64/ tests/example_kem.c -o example_kem -loqs -lcrypto
Here ‘x86_64-w64-mingw32-gcc’ specifies the cross-compiler being used to cross-compile the ‘example_kem.c’ file. The -I and -L options are the same as explained in the previous blog
The main difference as compared to the previous compilation is that the ‘include’ and ‘lib’ directories of both OpenSSL and LibOQS are being specified here.
The above command will produce a cross-compiled ‘example_kem.exe’. We will send this executable alongwith ‘liboqs.dll’ and ‘libcrypto-3-x64.dll’ to our Windows machine.
DLL Files in Windows
The above two dll files are to be placed in ‘C:\Windows\System32’ directory. Now if we run the example_kem.exe from command prompt or powershell, we will get this output.  This proves that both LibOQS and OpenSSL were cross-compiled successfully. Also our executbale was cross-compiled successfully. We now move towards PQ-Secure Strongswan cross-compilation.
Post Quantum Secure Strongswan Cross-compilation for Windows
The cross-compilation steps for PQ Strongswan will mostly be the same as done for simple PQ Strongswan in the previous blog. Here however, we’ll have to add extra options to configure script to use both cross-compiled libraries as well as the mingsw-w64 cross-compiler for building strongswan.
We move into the ‘windows-sswan-src’ directory, obtain PQ Strongswan source, and extract it, and create the ‘build’ directory that will hold the cross-compiled Strongswan files and folders.
1
2
3
4
cd /home/umair/windows-sswan-src
wget https://download.strongswan.org/strongswan-6.0.0beta4.tar.bz2
tar xf strongswan-6.0.0beta4.tar.bz2 && cd strongswan-6.0.0beta4/
mkdir build
Now, we will run the configure script as
1
CFLAGS="-g -O2 -Wall -Wno-pointer-sign -Wno-format-security -Wno-format -mno-ms-bitfields -I/home/umair/windows-liboqs-src/liboqs/build/include/ -I/home/umair/windows-openssl-src/openssl/build/include/" LDFLAGS="-L/home/umair/windows-liboqs-src/liboqs/build/lib/ -L/home/umair/windows-openssl-src/openssl/build/lib64/" ./configure --prefix=$PWD/build --host=x86_64-w64-mingw32 --disable-defaults --enable-monolithic --enable-static --enable-svc --enable-ikev2 --enable-ikev1 --enable-nonce --enable-pem --enable-pkcs1 --enable-x509 --enable-openssl --enable-socket-win --enable-kernel-wfp --enable-kernel-iph --enable-pubkey --enable-swanctl --with-swanctldir=swanctl --with-strongswan-conf=strongswan.conf
These options will make sure to configure strongswan to use our specified cross-compiler i.e. mingw-w64. Also it will use the ‘include’ and ‘lib’ directories of both LibOQS and OpenSSL. Also various options to enable cross-compilation are being specified. More details about these options can be seen from the ‘–help’ option of configure script, and these recommendations were also used.
After successful configuration, we compile and install to build directory using
1
2
make -j7
make install
This will install the cross-compiled ‘charon-svc.exe’ service for windows in the build directory. Also, the build directory contains various configuration files that will be used later on.
Testing Cross-compiled PQ Secure Strongswan on Windows
We now move the entire ‘build’ directory of cross-compiled PQ Strongswan to our Windows machine where we previously tested LibOQS and OpenSSL. Further steps are to be done on the windows machine.
- Copy the ‘libcharon-0.dll’ and ‘libstrongswan-0.dll’ dll files from ‘build/lib/bin’ to ‘C:\Windows\System32’
- Copy the ‘strongswan.conf’ file from ‘build/share/strongswan/template/config/’ to the ‘build/bin’ directory where ‘charon-svc.exe’ already exists.
- Copy the ‘plugins’ and ‘strongswan.d’ folders from ‘build/share/strongswan/template/config/’ to the ‘build/bin’ directory.
- Copy the ‘swanctl.exe’ executbale from ‘build/sbin’ directory to the ‘build/bin’ directory.
- Create a directory named ‘swanctl’ inside ‘build/bin’ directory. Create a configuration file named ‘swanctl.conf’ inside this swanctl directory. This file will be used as configuration file for the swanctl plugin.
- From the ‘build/bin’ directory, run the ‘charon-svc.exe’ service
1
.\charon-svc.exe
If everything was succesfull till this point, we should see the following output from this command. 
Next, we use the swanctl.exe executable with the ‘–list-algs’ option to see the PQ algorithms enabled by the oqs plugin.
1
.\swanctl.exe --list-algs
Specific portion of the output looks like this
Testing
Our test scenario includes establishing an IPSec tunnel using one of the available PQ crypto algorithms between two end-points. One of the end-points will be my local machine connected to a home network with a router that performs NATting using a Public IP on the WAN side and local private subnet on the LAN side. The other end point will be an AWS EC2 instance of Ubuntu running PQ Secure strongswan which has been compiled using the above descibed method.
Once we have PQ strongswan successfully running on both end points, we proceed towards swanctl and other configuration files on both local machine and the AWS instance.
asd
AWS EC2 Instance Configurations
To keep things simple, we will try to use as much of the default settings in AWS as possible. These include staying as close to default Routes, Subnets, Public IP, and Security Groups as possible. We will only modify the Security Groups to allow ICMP, SSH and UDP traffic at port 500 (and 4500) for Ping, Remote Access and ISAKMP packets respectively. Following are the inbound rules for this security group
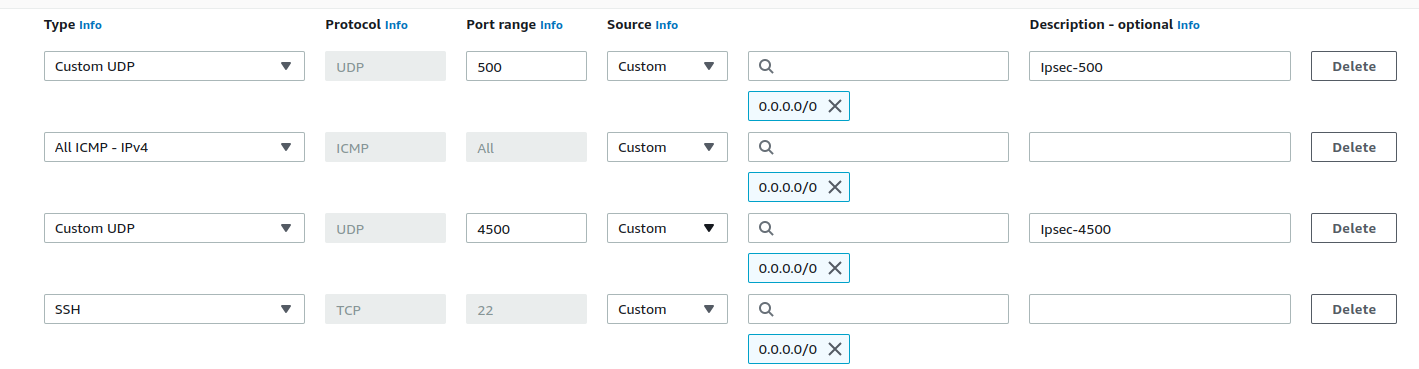
Note: These rules are being used only for testing purposes. In a real production environment, you wouldn’t be specifying wildcard addresses like 0.0.0.0/0 that allow inbound traffic from anywhere
Next, we configure the swanctl.conf file at ‘/home/ubuntu/sswan-src/strongswan-6.0.0beta4/build/etc/swanctl’ as follows
1
2
3
4
5
6
7
8
9
10
11
12
13
14
15
16
17
18
19
20
21
22
23
24
25
26
27
28
29
30
31
32
33
34
35
36
37
38
39
connections {

   gw-gw {
      local_addrs  = <private IP of EC2 instance connected to Internet gateway>
      remote_addrs = <Public IP of Home Router>

      local {
         auth = psk
         #id = moon.strongswan.org
      }
      remote {
         auth = psk
         #id = sun.strongswan.org
      }
      children {
         net-net {
            local_ts  = 10.10.10.0/24
            remote_ts = 10.10.10.0/24

            #updown = /usr/local/libexec/ipsec/_updown iptables
            rekey_time = 5400
            rekey_bytes = 500000000
            rekey_packets = 1000000
            esp_proposals = aes256-sha256-x25519-ke1_kyber3
         }
      }
      version = 2
      mobike = no
      reauth_time = 10800
      proposals = aes256-sha256-x25519-ke1_kyber3
   }
}

secrets {
   ike-1 {
      id = 0.0.0.0/0
      secret=<pre-shared key>
}}
Local Machine Configurations
Keeping everything close to defaults, we dont need to change any Firewall rules to allow ports or anything. As this is a simple testing scenario, we will initiate tunnel connections from the local end-point. This will ensure that IPSec connections are seen by the router as outbound connections and hence they won’t be blocked by the router.
We now configure the swanctl file of our local machine placed at ‘/home/umair/strongswan-src/strongswan-6.0.0beta4/build/etc/swanctl’ as follows
1
2
3
4
5
6
7
8
9
10
11
12
13
14
15
16
17
18
19
20
21
22
23
24
25
26
27
28
29
30
31
32
33
34
35
36
37
38
connections {

   gw-gw {
      local_addrs  = <Private IP of local machine obtained by router's DHCP>
      remote_addrs = <Public IP of EC2 instance>

      local {
         auth = psk
         #id = moon.strongswan.org
      }
      remote {
         auth = psk
         #id = sun.strongswan.org
      }
      children {
         net-net {
            local_ts  = 10.10.10.0/24
            remote_ts = 10.10.10.0/24

            #updown = /usr/local/libexec/ipsec/_updown iptables
            rekey_time = 5400
            rekey_bytes = 500000000
            rekey_packets = 1000000
            esp_proposals = aes256-sha256-x25519-ke1_kyber3
         }
      }
      version = 2
      mobike = no
      reauth_time = 10800
      proposals = aes256-sha256-x25519-ke1_kyber3
   }
}

secrets {
   ike-1 {
      id = 0.0.0.0/0
      secret=<pre-shared key>
}}
After the swanctl.conf files have been properly configured on both endpoints, we will start the charon daemon. It is found in the ‘strongswan-build-directory’/libexec/ipsec on both endpoints. Next, in another terminal window, we move into ‘strongswan-build-directory’/sbin and use
1
./swanctl --load-all
command to load the configurations that were written into the swanctl.conf file. Following is the output of this command

After loading the swanctl configuration on both endpoints, we move towards initiating the IPSec tunnel from the local machine and monitoring IPSec packets on the EC2 instance.
First we run the logs monitoring command on the EC2 instance as
1
tail -F /var/log/syslog
Now run the swanctl initiation for child_sa from local machine as below
1
./swanctl --initiate --child net-net
A PQ secure tunnel using PQ Kyber KEM algorithm has been successfully established between the two endpoints. Now any communication from the specified traffic selectors will go through the internal encrypted/authenticated ESP tunnel.